

Serial Communication Example using Pi4J.
The following example demonstrates how to transmit and receive data using the Raspberry Pi serial port.
(A complete article on building and installing a serial port on the Raspberry Pi is available here: http://www.savagehomeautomation.com/projects/raspberry-pi-installing-a-rs232-serial-port.html)
Prerequisites
By default, the serial port on the Raspberry Pi is configured as a console port for communicating with the Linux OS shell. If you want to use the serial port in a software program, you must disable the OS from using this port. Please see this blog article by Clayton Smith for step-by-step instructions on how to disable the OS console for this port: http://www.irrational.net/2012/04/19/using-the-raspberry-pis-serial-port/
Source Code
The source code for this example is included in the github repository:
https://github.com/Pi4J/pi4j-v1/tree/master/pi4j-example/src/main/java/SerialExample.java
/*
 * #%L
 * **********************************************************************
 * ORGANIZATION  :  Pi4J
 * PROJECT       :  Pi4J :: Java Examples
 * FILENAME      :  SerialExample.java
 *
 * This file is part of the Pi4J project. More information about
 * this project can be found here:  https://www.pi4j.com/
 * **********************************************************************
 * %%
 * Copyright (C) 2012 - 2019 Pi4J
 * %%
 * This program is free software: you can redistribute it and/or modify
 * it under the terms of the GNU Lesser General Public License as
 * published by the Free Software Foundation, either version 3 of the
 * License, or (at your option) any later version.
 *
 * This program is distributed in the hope that it will be useful,
 * but WITHOUT ANY WARRANTY; without even the implied warranty of
 * MERCHANTABILITY or FITNESS FOR A PARTICULAR PURPOSE.  See the
 * GNU General Lesser Public License for more details.
 *
 * You should have received a copy of the GNU General Lesser Public
 * License along with this program.  If not, see
 * <http://www.gnu.org/licenses/lgpl-3.0.html>.
 * #L%
 */


import com.pi4j.io.serial.*;
import com.pi4j.util.CommandArgumentParser;
import com.pi4j.util.Console;

import java.io.IOException;
import java.util.Date;

/**
 * This example code demonstrates how to perform serial communications using the Raspberry Pi.
 *
 * @author Robert Savage
 */
public class SerialExample {

    /**
     * This example program supports the following optional command arguments/options:
     *   "--device (device-path)"                   [DEFAULT: /dev/ttyAMA0]
     *   "--baud (baud-rate)"                       [DEFAULT: 38400]
     *   "--data-bits (5|6|7|8)"                    [DEFAULT: 8]
     *   "--parity (none|odd|even)"                 [DEFAULT: none]
     *   "--stop-bits (1|2)"                        [DEFAULT: 1]
     *   "--flow-control (none|hardware|software)"  [DEFAULT: none]
     *
     * @param args
     * @throws InterruptedException
     * @throws IOException
     */
    public static void main(String args[]) throws InterruptedException, IOException {

        // !! ATTENTION !!
        // By default, the serial port is configured as a console port
        // for interacting with the Linux OS shell.  If you want to use
        // the serial port in a software program, you must disable the
        // OS from using this port.
        //
        // Please see this blog article for instructions on how to disable
        // the OS console for this port:
        // https://www.cube-controls.com/2015/11/02/disable-serial-port-terminal-output-on-raspbian/

        // create Pi4J console wrapper/helper
        // (This is a utility class to abstract some of the boilerplate code)
        final Console console = new Console();

        // print program title/header
        console.title("<-- The Pi4J Project -->", "Serial Communication Example");

        // allow for user to exit program using CTRL-C
        console.promptForExit();

        // create an instance of the serial communications class
        final Serial serial = SerialFactory.createInstance();

        // create and register the serial data listener
        serial.addListener(new SerialDataEventListener() {
            @Override
            public void dataReceived(SerialDataEvent event) {

                // NOTE! - It is extremely important to read the data received from the
                // serial port.  If it does not get read from the receive buffer, the
                // buffer will continue to grow and consume memory.

                // print out the data received to the console
                try {
                    console.println("[HEX DATA]   " + event.getHexByteString());
                    console.println("[ASCII DATA] " + event.getAsciiString());
                } catch (IOException e) {
                    e.printStackTrace();
                }
            }
        });

        try {
            // create serial config object
            SerialConfig config = new SerialConfig();

            // set default serial settings (device, baud rate, flow control, etc)
            //
            // by default, use the DEFAULT com port on the Raspberry Pi (exposed on GPIO header)
            // NOTE: this utility method will determine the default serial port for the
            //       detected platform and board/model.  For all Raspberry Pi models
            //       except the 3B, it will return "/dev/ttyAMA0".  For Raspberry Pi
            //       model 3B may return "/dev/ttyS0" or "/dev/ttyAMA0" depending on
            //       environment configuration.
            config.device(SerialPort.getDefaultPort())
                  .baud(Baud._38400)
                  .dataBits(DataBits._8)
                  .parity(Parity.NONE)
                  .stopBits(StopBits._1)
                  .flowControl(FlowControl.NONE);

            // parse optional command argument options to override the default serial settings.
            if(args.length > 0){
                config = CommandArgumentParser.getSerialConfig(config, args);
            }

            // display connection details
            console.box(" Connecting to: " + config.toString(),
                    " We are sending ASCII data on the serial port every 1 second.",
                    " Data received on serial port will be displayed below.");


            // open the default serial device/port with the configuration settings
            serial.open(config);

            // continuous loop to keep the program running until the user terminates the program
            while(console.isRunning()) {
                try {
                    // write a formatted string to the serial transmit buffer
                    serial.write("CURRENT TIME: " + new Date().toString());

                    // write a individual bytes to the serial transmit buffer
                    serial.write((byte) 13);
                    serial.write((byte) 10);

                    // write a simple string to the serial transmit buffer
                    serial.write("Second Line");

                    // write a individual characters to the serial transmit buffer
                    serial.write('\r');
                    serial.write('\n');

                    // write a string terminating with CR+LF to the serial transmit buffer
                    serial.writeln("Third Line");
                }
                catch(IllegalStateException ex){
                    ex.printStackTrace();
                }

                // wait 1 second before continuing
                Thread.sleep(1000);
            }

        }
        catch(IOException ex) {
            console.println(" ==>> SERIAL SETUP FAILED : " + ex.getMessage());
            return;
        }
    }
}
JavaDoc
The following JavaDoc links are the primary interfaces used to communicate via the Pi's serial ports:
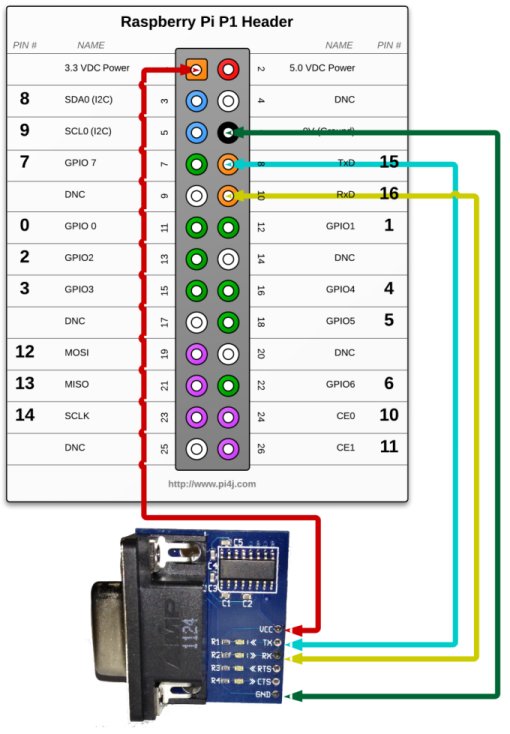
Wiring Diagram
The circuit below illustrates a RS232 serial port connected to the Raspberry Pi's GPIO header.
The following circuit can be used in conjunction with this sample code.
(A complete article on building and installing a serial port on the Raspberry Pi is available here: http://www.savagehomeautomation.com/projects/raspberry-pi-installing-a-rs232-serial-port.html)
Navigate
If you have not already downloaded and installed the Pi4J library on the RaspberryPi, then view this page for instructions on where to download and how to install Pi4J:
Download & Install Pi4J
First, locate the SerialExample.java source file in the samples folder of the Pi4J installation on the RaspberryPi.
You can use the following command on the Pi's console or SSH terminal to navigate to this path:
cd /opt/pi4j/examples
Compile
Next, use the following command to compile this example program:
javac -classpath .:classes:/opt/pi4j/lib/'*' -d . SerialExample.java
Execute
The following command will run this example program:
sudo java -classpath .:classes:/opt/pi4j/lib/'*' SerialExample
Output
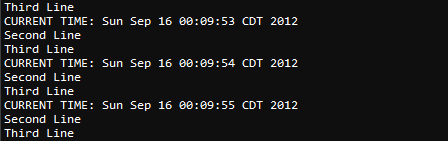
To test this program you will need to connect your computer via serial cable and use a serial communications tool such as Hyperterminal or Indigo Terminal Emulator. Establish a connection using baud rate 34800 with parity set to NONE, data bits to 8 and stop bits to 1. (38400,N,8,1) Once connected you should see the following data displayed in the terminal software:
CURRENT TIME: <Date/Time>
Second Line
Third Line
This data should be repeated every second.